Wednesday, December 12, 2007

Installing Windows XP

Installing Windows XP on your PC

Installing Windows XP on your PC is done by a certain procedure. First you backup your data, passwords and drivers, followed by partitioning your hard disk and setup of Windows XP. When Windows XP has been installed on your PC, you can start making changes to the different settings and optimize Windows XP. Each step in this installing and optimizing procedure is described on this page and the page Optimize Windows XP computer (summary). This page describes the first part about installing of Windows XP and gives you the hyperlinks to the concerned pages (each will open in a new window), similar to the icons on the left of each page.
Saving personal data, passwords and drivers
This page describes how to safe all your personal data (My Documents, My Pictures, My Music, Downloads, E-mail, Favorites, Address book,...), recover passwords (internet connection, e-mail, FTP, MSN/Live Messenger, visited websites) and safe current hardware drivers. All the tools and information you need to know about before you reinstall your Windows XP!
Creating boot disk (bootable floppy disk)
Actually not needed for installing Windows XP, but a boot disk can be useful (for partitioning purposes). Especially if you would like to create a free system image boot disk, you also need a MS-DOS boot disk.
Creating bootable CD
If your Windows XP doesn't boot anymore, a bootable CD-ROM can be very useful for you. Here you read about different bootable CD's, which can be very useful (saving your files from NTFS partitions, cracking administrator password, ...)! Some of them are must haves!
Partitioning hard disk (primary and extended partitions)
To be able to create a backup of your system, I advise to use multiple partitions: C for Windows, D for your data and E for creating a system backup. Separate your Windows and personal data, which makes it a peace of cake to recover your Windows XP with a system image. Here you read more about creating partitions and how to manage them.
Formatting hard disk/partitions (FAT32/NTFS)
After you have created new partitions, you need to format them. Actually, within Windows XP this is done automatically during setup.
Creating a multiboot/dualboot system
Information you need to know to create a multiboot system.
Setup: installing Windows on your hard disk
Running the Windows XP setup: what to do and what not to do during setup.
Installing hardware drivers
After you have setup your Windows XP, you need to install the hardware drivers. If you don't have them (anymore), you can download them from the internet.
Internet connection settings: DSL/Cable/56K
This page describes the realisation and optimization of an internet DSL/Cable/56K internet connection.
Updating Windows: critical and optional updates
One of the first things to do, is updating Windows to fix critical Windows problems.
Windows XP performance settings (part I)
Now Windows (including the updates) is installed, it's time to modify the Windows settings to get a more user friendly system. The first part is about advanced system settings, (disabling) Windows Messenger, burning a CD-ROM and changing the search function.
Windows XP performance settings (part II)
Now Windows (including the updates) is installed, it's time to modify the Windows settings to get a more user friendly system. The second part is about Taskbar/Start menu, Windows Explorer settings, hibernation, recycle bin and keyboard settings, task scheduler, sounds and audio, windows software and internet options.
E-mail settings Outlook Express
This page describes the e-mail settings for Outlook Express.
E-mail settings Outlook
This page describes the e-mail settings for Outlook.
Start menu and Quick Launch toolbar
Information about tweaking the Start menu and the Quick Launch toolbar for better navigation.
Desktop properties and screen resolution
Changing your desktop properties and screen settings.
Creating multiple user accounts
Installing Windows 98/ME Operating System

This procedure demonstrates how to install Windows ME operating system. The procedure to install Windows 98 is very similar to ME. Since Windows ME is the latest Windows 9x family operating system, it will be used to demonstrate the installation procedure.
Boot your system with Windows 98 or ME boot disk. When the system starts you will be presented with a menu which gives you the option to boot with or without CD-ROM support. Select the option to boot with CD-ROM support. This would create a RAM drive and load a device driver to support your DVD/CD-ROM. The RAM drive is assigned to D: (D drive) and your CD-ROM should be assigned to E: (E drive).
Place the Windows ME CD into the drive. At A: command prompt type E: and press enter. Then type setup. At his stage Windows runs DOS based scandisk to verify if your hard disk has any problems. If there are no problems Windows proceeds with the setup and launches the Windows ME setup wizard as shown in figure 1.
After agreeing to the license agreement Windows will ask you to type in your product key. The default directory to install windows is c:\windows, I recommend that you leave it as default. Next you would be given four types of installation options which are Typical, Portable, Compact, and Custom. Choosing typical would install the most common components and is suitable for most people. If you want to specify which components to install then choose custom. You would be presented with few other dialog boxes such entering your name and company name, option to create a Windows ME boot disk before file copy process begins. After completing the copying process Windows restarts and boots from the hard disk, make sure you remove your floppy disk from the drive. It will detect your plug and play devices and would present a few more dialog boxes. Just read the instructions on dialog boxes and proceed as required. Windows would restarts again after completing final setup stage. This does not mean everything is completely setup. Some of your hardware device may have conflicts or may not have drivers loaded as Windows does not contain those drivers.
From device manager you can check if all the drivers has been loaded or if there are any conflicts. From the start menu select Start -> Settings -> Control Panel. Click on the System icon and then from the System Properties window select the Device Manager tab. This lists all the devices as shown in figure 2.
If there are any yellow exclamation mark "!" next to any of the listed device, it means that no drivers or incorrect drivers has been loaded for that device. Your hardware should come with manufacturer supplied drivers. You need to install these drivers using automatic setup program provided by the manufacturer or you need to manually install these drivers. If you do not have the drivers, check the manufacturers website to download them.
To install a driver manually use the following procedure:
From the device manager double click on the device containing the exclamation mark.
This would open a device properties window.
Click on the Driver tab.
Click Update Driver push button. The Wizard for updating device driver pops up as shown in figure 3.
You now get two options. The first option provides an automatic search for the required driver. The second option allows you to specify the location of the driver. If you don't know the location of the driver choose the automatic search which would find the required driver from the manufacturer supplied CD or Floppy disk. Windows would install the required driver and ask you to restart the system for the changes to take affect. Use this procedure to install drivers for all the devices that contain an exclamation mark. Windows is completely setup when there are no more exclamation marks in the device manager.

Thursday, November 15, 2007

Click here for our Main Menu

Flash Memory Cards


The most popular types of flash memory cards for use in digital
cameras are: Secure Digital (SD), CompactFlash (CF), Memory
Stick (MS), MultiMediaCard (MMC) xD-Picture Card (xD) and
SmartMedia (SM).

The type of memory card you use is dictated by which digital
camera you buy. These cards are physically different and are
-not-
interchangeable.

eBay has become notorious for "fake memory card" sales,
thousands of people have been scammed by sellers who
are selling inferior or lower capacity cards that have been
relabeled and repackaged to look like the real thing. Buyer
beware - I recommend that you purchase your cards only from
reputable online vendors or brick and mortar stores. If you
must buy on eBay then check out this page at Overclockers.
com.au for ways to visually identify some (not all) of the most
popular fake cards. Also see our public discussion forum for more info.

LATEST CPU

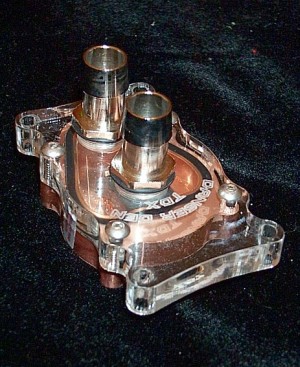
The Danger Den TDX is the latest CPU waterblock design from Danger Den.
The TDX has a copper baseplate, two chrome HF (high flow) barbs, and a
lexan (brass available) top. As with the RBX (their previous waterblock),
several different nozzles are available to tune the TDX's inlet restriction
to match your cooling loop. Mounting is done with bolts and springs through
motherboard mounting holes and the TDX top plate, and top plates are
available to use the TDX with AMD's Socket 462 (Socket A), all Athlon64
sockets, and Intel Socket 478 (Pentium 4) and Socket 603/604 (Xeon)

motherboards.

Here's what Dangerden said about the TDX design concept:

"Based off the popular RBX waterblock design, the TDX takes advantage of
all the features and performance levels that made the RBX one of the best
performing waterblocks on the market, while simplifying and improving the
user interface. Key features of the TDX include:

Mother Board

Most after-market motherboards produced today are designed for so-called IBM-compatible computers, which hold over 96% of the personal computer market today.[2] Motherboards for IBM-compatible computers are specifically covered in the PC motherboard article.

The basic purpose of the motherboard, like a backplane, is to provide the electrical and logical connections by which the other components of the system communicate.

A typical desktop computer is built with the microprocessor, main memory, and other essential components on the motherboard. Other components such as external storage, controllers for video display and sound, and peripheral devices are typically attached to the motherboard via edge connectors and cables, although in modern computers it is increasingly common to integrate these "peripherals" into the motherboard.


The Octek Jaguar V motherboard from 1993. This board has 6 ISA slots but few onboard peripherals, as evidenced by the lack of external connectors.
The Octek Jaguar V motherboard from 1993.[6] This board has 6 ISA slots but few onboard peripherals, as evidenced by the lack of external connectors.

Additionally, nearly all motherboards include logic and connectors to support commonly-used input devices, such as PS/2 connectors for a mouse and keyboard. Early personal computers such as the Apple II or IBM PC included only this minimal peripheral support on the motherboard. Additional peripherals such as disk controllers and serial ports were provided as expansion cards.

Given the high thermal design power of high-speed computer CPUs and components, modern motherboards nearly always include heatsinks and mounting points for fans to dissipate excess heat.

Integrated peripherals

Diagram of a modern motherboard, which supports many on-board peripheral functions as well as several expansion slots.

With the steadily declining costs and size of integrated circuits, it is now possible to include support for many peripherals on the motherboard. By combining many functions on one PCB, the physical size and total cost of the system may be reduced; highly-integrated motherboards are thus especially popular in small form factor and budget computers.